Rotbox Rustorations | Classic and Custom Welding Shop and Garage
  • Services
    • Panel Fabrication
    • Custom Car Builds
    • CNC Plasma Cutting
    • Sheet Metal Folding
    • Tube Bending
  • Projects
  • Shop
  • About
  • Contact
  • Services
    • Panel Fabrication
    • Custom Car Builds
    • CNC Plasma Cutting
    • Sheet Metal Folding
    • Tube Bending
  • Projects
  • Shop
  • About
  • Contact

Car DIY: Replacing VW T25 Front Cab Headlining

8/17/2016

 
VW T25 Headlining
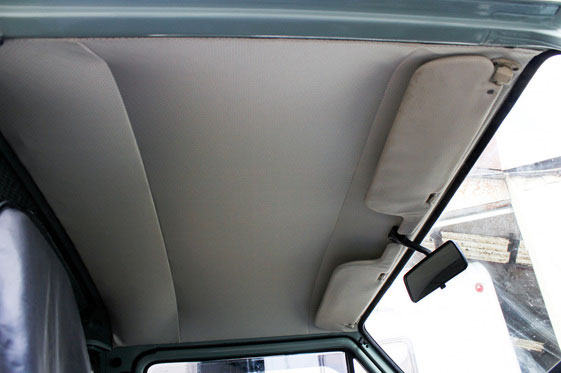
As part of the resto work on our VW T25 I needed to make a new front cab headlining. The old one was a bit dried out, battered and yellowed with age so I decided a replacement was in order.

The only problem was I had a job to find anyone selling them, so that meant getting the sewing machine out and doing it myself which I've turned into another Car DIY tutorial.

Getting Started: You Will Need

  • Sewing machine
  • 1.5m Fabric- we went with white perforated vinyl to match the original, but choose anything you like
  • Coloured thread to match fabric
  • Biro pen
  • Tape measure
  • Old headlining (optional, but useful to have for measurements)

3 IMPORTANT RULES FOR DIY CAR UPHOLSTERY: SEWING A VW T25 FRONT CAB HEADLINING YOURSELF

Picture
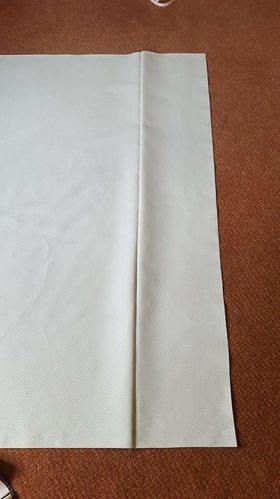
Sewing a Replacement front cab headlining for our VW T25- the first straight stitch for the rods completed

1) MEASURE MEASURE MEASURE
Don't underestimate the power of your tape measure. I measured every bit of that old headlining about a million times before I cut anything to make sure it was accurate, I drew a diagram with all the measurements on it and everything. If you don't have the old headlining or it's not in any shape to use just try measuring the inside of the van instead, or use my measurements on the diagram below.
Picture
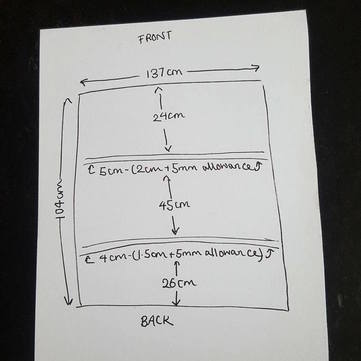
The diagram- all the measurements needed to make a front cab headlining for a VW T25

2) DRAW DRAW DRAW
I used a black biro pen (just on the back part that wasn't on show) to mark out all the lines I wanted to sew as well as the centre of the fabric- which turned out to be really useful when it came to fitting the headlining too.

3) GO AS SLOWLY AS YOU NEED TO
It took me way longer than it should have to do all that measuring and sew two lines on a small piece of fabric- but it's better than rushing it, making a mistake and wasting fabric. With the white perforated vinyl I was using once you puncture it with the needle it makes a permenant hole so you can't really unpick it again as it makes a mess, not to mention weakens the fabric.

Basic Steps to Sewing Your Own Replacement Front Cab Headlining for a T25

  • Throughly measure your old headlining and draw a diagram on paper of all the measurements. Don't forget to include a 5mm seam allowance for the two middle stitches

  • With a biro pen or pencil, mark on which is the top (windscreen) part, the bottom and the driver and passenger side as well as all the lines you need to sew. Finally add a line down the middle going from back to front, to help you when it comes to fitting the headlining
 
  • Lining up your pen marks, carefully sew your two straight line stitches for the centre rods
 
  • Slice the corners off the two tubes you've just stitched, using your old headlining as a guide for how much to take off (mine was about 4cm off each side)
 
  • To make it just like your original, stitch (or glue) a thin strip of cardboard to the bottom edge. I used a cheap old belt for this bit

10 Steps to Fitting a New Front Cab Headlining in your VW T25 Camper

Picture
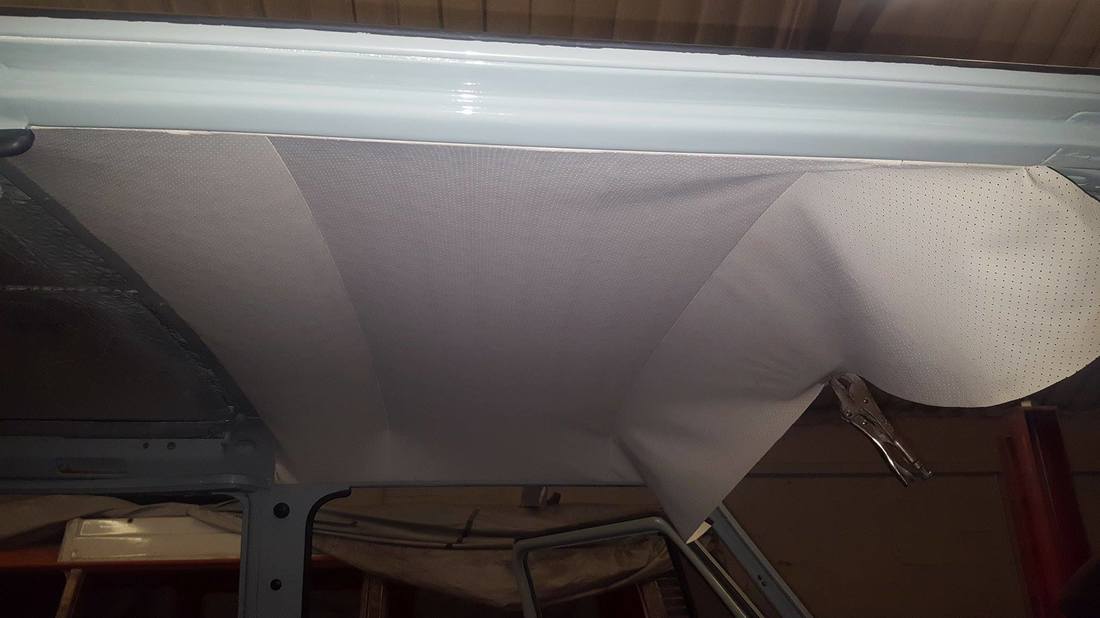
Fitting replacement front cab headlining in our VW T25
  1. First, if possible remove your front windscreen- this will make it easier to glue the fabric into position at the end. If this isn't possible you'll have to just try and tuck it behind the windscreen seal (I'm not sure how successful this will be as we removed the windscreen to do ours)
  2. Next, get your newly sewn headlining and put the two metal rods from your old headlining into the two loops you sewed earlier. Position these into the "witch hat" holes for them in your van, making sure you have the headlining the correct way round
  3. Now you can start tucking the very edge of the fabric into position. Start at the back edge in the middle (this is where the biro lines are useful!) and get the full back edge in place
  4. Make sure you work round from the middle to the front windscreen in a straight line or you could end up with "baggy bits" all over (that's the technical term for it) 
  5. As you go along about every 5-10cm use a rubber hammer and a folded piece of cardboard (to protect the fabric) to tap down the metal edges that hold the fabric in position
  6. Be careful when you move round to the driver and passenger side edges. For a professional finish you'll need to pull the fabric quite taught, but if you get carried away tucking it in at one side you likely won't be able to get it in properly at the opposite side
  7. Only glue the front windscreen bit once all the other sides are tucked in. If it's still looking a bit baggy at this point don't worry- when you pull it taught to glue the windscreen that should disappear
  8. You only need to glue the very edge of the windscreen where the seal sits, not the metal part that the sun visors and rear view mirror go on (unless you didn't remove your front windscreen, then gluing this top edge might be your only option.) Using brush on contact adhesive is best, but spray glue will work too, it will just be messier. As at the beginning, start in the middle and work your way out to the sides
  9. Cut the holes for the rear view mirror, sun visor and interior lights once the headlining is fully fitted in position and glued into placed- if you try and do it before based on the old headlining as a template the holes might end up in the wrong place. Use clean hands and a sharp Stanley knife to make the holes 
  10. Refit the windscreen- also consider replacing your front windscreen seal at this point if it's the original one, as window seals dry out over time letting in water that causes rot​
Picture
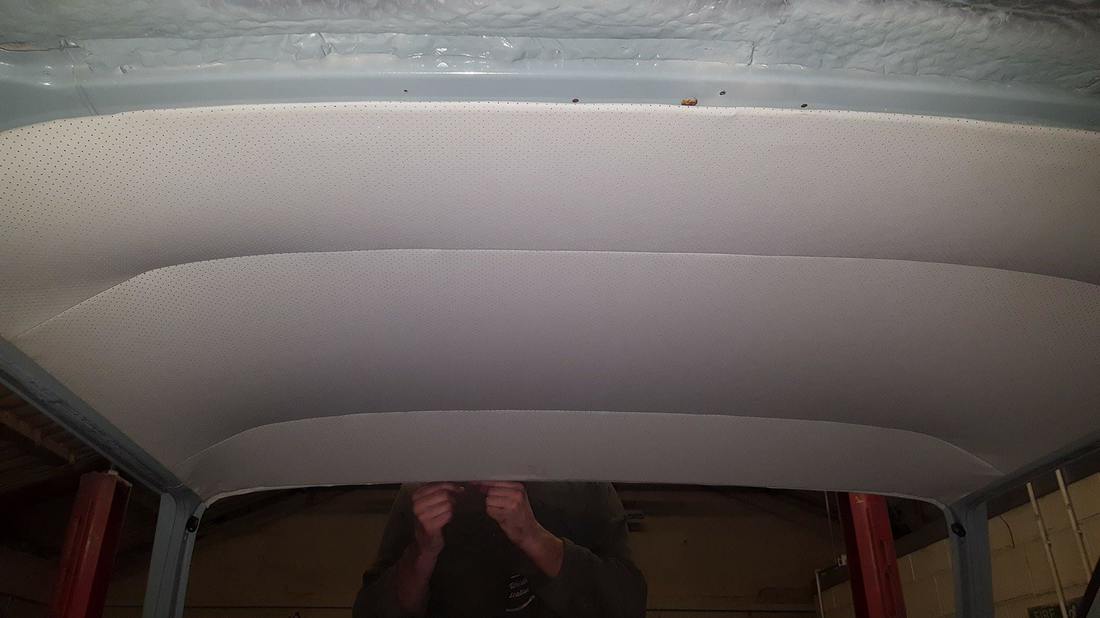
New headlining fitted into position- just need to make the holes for the rear view mirror and sun visors!

And That's It!

Well there you go, making and fitting your own headlining for a VW T25 is pretty simple to do, so have a try at some DIY upholstery on your camper van- or pop down to see us and we'll whip you one up.
Read More about Our VW T25 Resto Project

Liked this? Check out these...

A Handy Guide to Bringing Your Classic Car Out of Hibernation
6 Bad Habits to Break When Working on Your Car
Q&A: Should I Buy a Classic Car as a Daily Driver?


Comments are closed.

    watch our new youtube channel

    Our blog delivers brutally honest advice for the “rotbox” in your life with the aim of raising the standard of  car projects everywhere.

    Practical, direct, actionable ideas and zero bull.

    Read on.

    About
    Rotbox Rustorations


    Follow Us


    visit our etsy shop

    Picture
    Vintage Toy Ratty Bay Window

    Categories

    All
    Car DIY
    Car Wars
    Making Money
    Q&A
    Spending Money
    Workshop Life


    Archives

    November 2017
    August 2017
    July 2017
    March 2017
    February 2017
    January 2017
    November 2016
    October 2016
    August 2016
    July 2016
    June 2016
    May 2016
    April 2016
    March 2016

Picture

About

We're a dedicated, independent fabrication company based in rural North Yorkshire that specialises in classic and custom car panel fabrication and light general fabrication. We fabricate of one off, premium quality panels and stock items, such as metal door cards, metal floor plates, arch tubs and wide arch kits, as well as undertaking general light fabrication work including CNC plasma cutting, CNC sheet metal bending and CNC tube bending.
EMAIL ENQUIRIES ONLY
Email: hello@rotboxrustorations.com
​

Unit 2, Pickhill, Thirsk, North Yorkshire, YO7 4JU